How Ansible works and the Python code behind it – How Python Integrates with IaC Concepts
How Ansible works and the Python code behind it
A lot of this section will be more of the same that you saw in the previous section, similar tools, similar implementations, and whatnot. But, like SaltStack, this too is an important and very common tool in the IaC realm, which is why it deserves the coverage that we are giving it. Ansible is powerful, its learning curve is probably not as steep as that of SaltStack, and it is easier on users who like more cleanly pre-packaged code that they don’t have to modify too much. Oh, and it’s also written in Python.
Ansible is run and maintained by IBM under its Red Hat label (I like that tech companies have their own DC Vertigo-esque labels for their more risque stuff now; it really makes the things I say about it being an art even more true). It is meant to maintain and affect servers using SSH key pairs to access those servers. That simplifies some things, such as when you control a server and all the associated servers are in the same virtual private cloud (VPC).
Ansible is a bit more flexible in terms of the OSs that you can control with it, but for this exercise, we will use old, reliable Ubuntu. With all that exposition out of the way, let’s get into the finicky details of Ansible and give you a little sample of how it works.
We will be reusing the same instances used during the Salt exercise for this, so let’s start with the master instance:
- Let’s start by using pip to install Ansible on the system:
pip install ansible ansible-inventory
Sometimes you may need to install pip as well, though that is not a frequent occurrence. Let’s run this command and install Ansible:

Figure 12.8 – Successful Ansible installation
2. Once you have done this, make a directory to use as the common Ansible configuration directory and go into it:
mkdir ansible_project
cd ansible_project
- The next thing to do is to create an inventory.ini file, which will serve the same function as the master IP in SaltStack but in reverse, with the IPs of the servers being controlled and placed in the controlling server.
- Run sudo nano inventory.ini, which will create the inventory file, and place a list of IP addresses that you want to run in there:
[myhosts]
<IP_1>
<IP_2>
5. Now, you can run the ansible-inventory -i inventory.ini –list command and this will give you the following list of hosts:
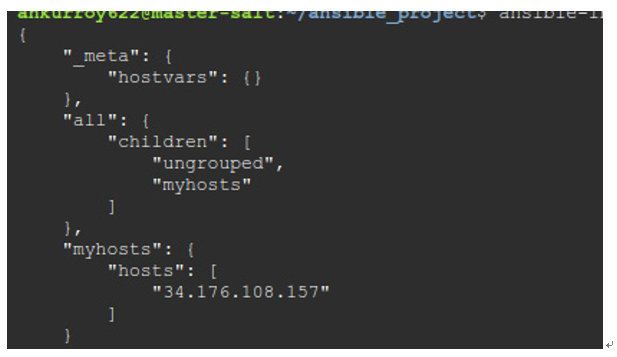
Figure 12.9 – Ansible inventory
- Next, you can ping these hosts to test your connection with the following command:
ansible myhosts -m ping -i inventory.ini - Now, you can run playbooks and runbooks through a centralized command server and you can even sort the hosts into fleets just by changing the inventory list.
Those are the basics of Ansible; now, let’s look a little deeper and find the Python behind the CLI as we did with SaltStack. We will do so by creating a custom module to use with Ansible. We’ll keep it local this time, but this is basically how you run custom operations with Ansible all the time.
Now, let’s create a new Ansible module, custom-made by us:
- In the environment where you have installed Ansible, create a hello_ansible.py file and add the following code to it:
from ansible.module_utils.basic import AnsibleModule
def join_strings(string_1, string_2):
return string_1+string_2
def main():
module_args = dict(
string_1=dict(type=’str’, required=True),
string_2=dict(type=’str’, required=True),
)
result = dict(changed=False, message=”” )
module = AnsibleModule(
argument_spec=module_args,
supports_check_mode=True
)
string_1 = module.params[‘string_1’]
string_2 = module.params[‘string_2’]
result[“message”] = string_1 + ” ” + string_2
module.exit_json(**result)
if __name__ == ‘__main__’:
main()
That gives us the Python code that will be executed and now we need to change the Python code’s permissions into something executable. We do this by using the following command:
chmod +x hello_ansible.py
2. Next, we need to make a playbook to run the function locally, and for that, we can create a playbook called hello.yml and add some code to it:
—
– hosts: localhost
gather_facts: false
tasks:
– name: Hello World
add_numbers:
string_1: Hello
string_2: Ansible
register: result
– debug:
var: result
3. Now, execute the YAML file:
ansible-playbook -M .
hello.yml
This will give you a result as a string, shown as follows:
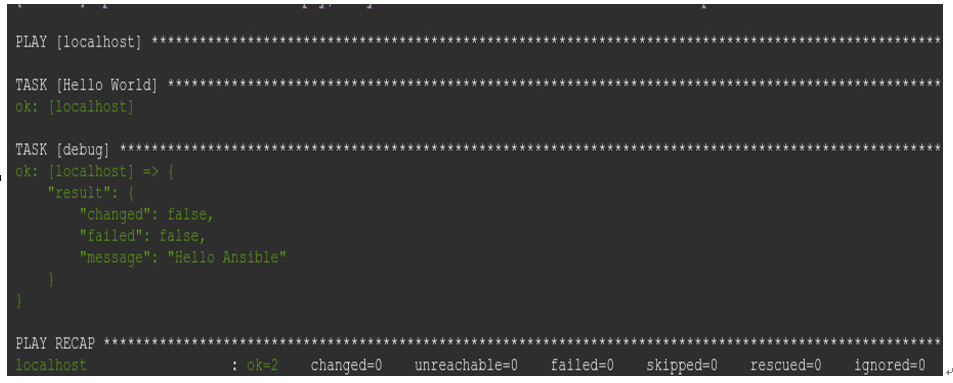
Figure 12.10 – Result of our Ansible module
That is how you create a customized Ansible module. This module will give you the sum of two strings that you put into it, perhaps the most basic operation that you can do with a module. But everything else is the same, even for more complex operations. Just replace join_strings in the code with the function of your choice and add the variables needed to execute that function and return the resulting value. Maybe, for example, it could be a function to restart a server or run a particular CLI command; it can be practically anything that you can do on a command line in the OS that you are using.
Now, even this is a little bit underpowered in terms of the resources that you can use and the way that you can use them. It is useful for more conventional systems, but for systems that require unconventional architectures, something like Terraform is better suited. We will now discuss how we can use Terraform with Python to automate IaC even further.