Automation and customization with Python’s Salt library 2 – How Python Integrates with IaC Concepts
5. Next, go back to the Salt master and run the following command:
sudo nano /etc/salt/master
6. After we have done so, we will insert the following lines at the bottom to account for interfacing between the master and the minions:
interface: 0.0.0.0
publish_port: 4505
ret_port: 4506
auto_accept: True
7. Next, we will run sudo systemctl start salt-master to initialize the Salt master system module, then run the sudo systemctl status salt-master command to get the status of the Salt master. When we run the command, we get something like the following:

Figure 12.5 – Running Salt master server
That is a running Salt master; now, we need to configure our minions.
The steps to configuring the minions are similar to those for the master, but with a few differences, as we will explore here:
- On each minion, run sudo nano /etc/salt/minion, and in the nano file, enter the following:
master: <salt_master_ip>
Replace salt_master_ip with the IP of your Salt master server.
2. Then, run sudo systemctl start salt-minion, which will initialize the minion. Then, run sudo systemctl status salt-minion to check whether the minion is running:

Figure 12.6 – Running Salt minion
3. Now, on the Salt master, you can run a little example command as follows:
sudo salt ‘*’ test.ping
That’s the basics of it. Now, let’s move to the part where we look at the Python code a little closer.
Let’s break down a particular Salt module so that we can learn the intricacies behind it:
- Each Salt module is a Python function that can be called. Let’s take one module as an example from the documentation, in this case, the one for network connections:
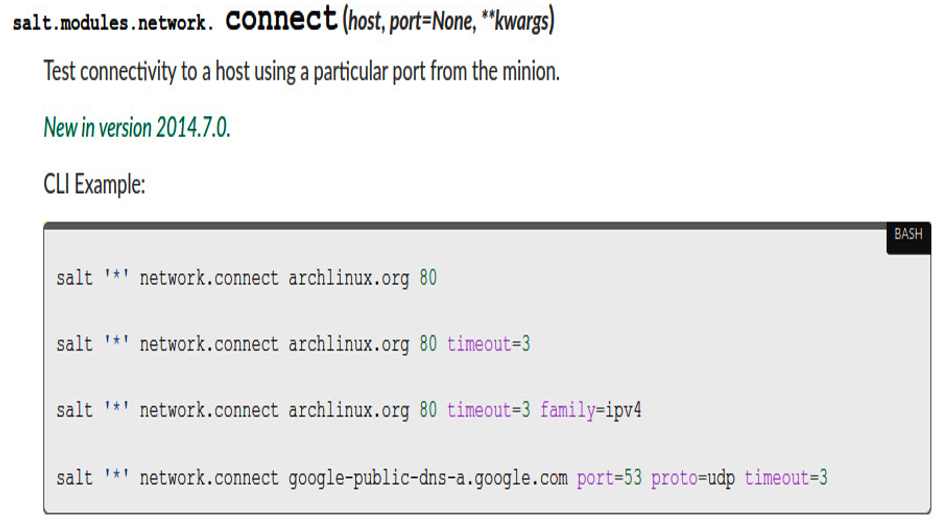
Figure 12.7 – Salt module from the documentation
This is great documentation! It shows you the function and the CLI version for it.
2. Let’s look at the function:
connect(host, port=None, **kwargs)
The connect function takes a hostname compulsorily and it takes a port number optionally. It also includes **kwargs, which is just a large number of arguments such as proto and timeout that the function may have. The following command connects to a DNS instance:
salt ‘*’ network.connect google-public-dns-a.google.com port=53 proto=udp timeout=3
The preceding command is for connecting to a Google public DNS with the connect function. An equivalent in code would be as follows:
connect(“google-public-dns-a.google.com”, port = 53, proto = “udp”, timeout = 3)
These two commands are equivalent, but you can see the pragmatism in running them from the command line, as these commands are far more comfortable in that way than as functions.
That stands true for a lot of command-line tools and is the reason that a lot of them exist in the first place.
Next, we will look at Ansible, which has a similar idea to execute but takes a slightly different approach while still using Python.